Posts

Hershey Quilt Show and some observations on machine quilting

I did make it to the Hershey Quilt Show yesterday.  (About a 3.5 hour ride from home, so possible as a day trip.)  Bethanne Nemesh was the featured artist.  Her pieces were absolutely stunning.  Several included her beaded piping, a really special finishing treatment.  (She explains how to make this on an episode of The Quilt Show.)  She had a couch/love seat with a peacock design on it.  Fantastic.  Some of her whole cloth quilts were also on display.  Lovely!  Her machine quilting is spectacular.  I really enjoy seeing the work of teachers like Bethanne and getting a chance to get up close and personal with it. There was also a display of antique quilts, all of which were basket quilts of some sort.  I never knew there were so many different basket patterns.  Both pieced and applique quilts were part of this display.  Many of the quilts in the general display were applique and just incredible.  Mostly han...

More thread painting

Image
on the red maple leaf quilt.  At present I'm working on quilting down the dark portions of the background.  I started with black thread (Omni by Superior) in the darkest areas.  I started with tiny pebbles but branched out into a near scribble quilting. After using the black I turned to a very dark forest green.  This was the first time I tried using #12 perle cotton (Valdani)  in my HQ Sweet Sixteen.  It worked very well with Omni in the bobbin.    Since some of the areas were graded from very dark to just dark, I overlapped the quilting in black and dark green.  The overlap allowed a smooth gradation in the quilting. In the photo below you can see the difference in weight between the Omni 40 wt thread and the #12 perle. (Perle above, Omni below) After working with the dark green perle, I switched to a slightly lighter green in Metler silk finished cotton 40 wt.  Again I overlapped some of the ...

Life Intervenes

Image
It has been way too long since I posted to this blog.  Amazing how life interferes with your best intentions.  Whether work gets in the way, or a sick pet, or a family emergency or just all the little things that take up your time day to day, we need to make the time to do the things we love. So today was great for me because I got back to quilting the red maple leaves panel that I had Spoonflower print from one of my photos. Stage one was to layer the sandwich.  I used backing (muslin), a flat batting (warm and white) and a wool batting (Hobbs wool) for my sandwich.  I actually pieced the wool as there will be lots and lots of quilting (stitching) on top and this is unlikely to get washed often. This is the sandwich pin basted and the red thread I decided to use for stage two.  Stage two was to stabilize the sandwich by outlining the red leaves and stitching the veins. Right away the stitching gives more definition to the piece.  Here is a c...

Calling all crazy quilters

Image
Do you love satins, silks, velvets, ribbons and laces.  Then you are probably a crazy quilter, even if you don't know it. Crazy quilts were popular in late Victorian Times.  Said to be inspired by the Japanese pavilion of the 1876 Philadelphia Centennial Exposition.  The idea of  a crazy quilt is to piece each section in an improvisational manner and then decorate the seam lines with fancy embroidery stitches.  (Originally these stitches may have actually attached the pieces to each other or to a foundation.)  Often little embroidered motifs like flowers, leaves and butterflies were also added to the pieces.  One tradition held that embroidering a spider on its web on the quilt would bring luck.  Buttons and beads can also be used in the decorations. (crazy quilt block and "helper") These quilts were usually for decorative purposes and were not laundered often.  Typically they would decorate the back of a settee or chair or would be...

Keeping a record (sketchbook)

Image
As a free motion quilter, I found that when I face a blank quilt surface, I struggle to determine what designs to use.  I have taken several classes (mostly through Craftsy) on free motion quilting and learned lots of designs.  But that blank surface seems to be destructive to my memory.   So I have started to  keep a diary/sketchbook of designs that I like.   For example, this is a sketch of my design Kaiser Roll. (demo available on my YouTube channel: Queen of Remnants.)  I add my own designs only after I have tested them, as the potential designs may change as they get translated over to actual stitching, rather than sketching.   This is a sketch of my design Shamrocks. (demo available on my YouTube channel: Queen of Remnants.)   The original design idea included a large pebble ringing each of the shamrock units.  But when I actually stitched it out, I found I preferred this version of the design. ...

Working with Thread Painting

Image
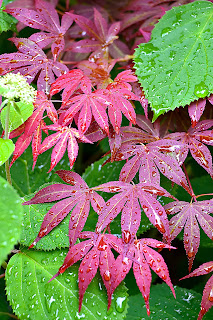
I've talked about having my photos printed on fabric by Spoonflower and quilting the resulting panels with thread painting.  I showed some of the quilts I had made in this manner.  Recently I had some more photos printed.  As I work through them I will chronicle some of the steps. Today I'm working on a panel with a picture of red maple leaves.  This is the photo that was uploaded to Spoonflower for this panel. And this is a photo of the panel I received from Spoonflower. I was truly astonished at how crisp and clear this print was.  (In fact, all the prints were amazing.) The next step in quilting this panel is choosing the threads to work with.  I like to choose many different threads, to add texture and depth to the finished problem.  So I pulled out my bins of threads and started to see what I already had that would work. I started with a reds.  They turned out to me more pinks, than reds, which I hadn't expected....

Marking a quilt for quilting

Image
          There are a number of ways to mark a quilt for quilting.  Stencils are available for a wide variety of designs.  Rulers and templates can be used to draw designs on the quilt top.  There are papers that are available to draw on, pin to the quilt and quilt over.  All of these work and can work well.  But there is another method I like to use if I want to do something that is not available in those other methods.            I had a quilt in which I had appliqued lizards crawling through open cubes.  I wanted to quilt those same lizards in the background.  So I used the method described below. The lizards were actually cut from the backing fabric.  I used those lizards to create a pattern to quilt as part of the background.           You will need your design, freezer paper, an iron and either white chalk (in stick form) or a pounce pad.  ...