Posts

Showing posts from April, 2018

Keeping a record (sketchbook)

Image
As a free motion quilter, I found that when I face a blank quilt surface, I struggle to determine what designs to use.  I have taken several classes (mostly through Craftsy) on free motion quilting and learned lots of designs.  But that blank surface seems to be destructive to my memory.   So I have started to  keep a diary/sketchbook of designs that I like.   For example, this is a sketch of my design Kaiser Roll. (demo available on my YouTube channel: Queen of Remnants.)  I add my own designs only after I have tested them, as the potential designs may change as they get translated over to actual stitching, rather than sketching.   This is a sketch of my design Shamrocks. (demo available on my YouTube channel: Queen of Remnants.)   The original design idea included a large pebble ringing each of the shamrock units.  But when I actually stitched it out, I found I preferred this version of the design. ...
Working with Thread Painting

Image
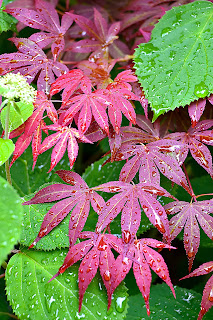
I've talked about having my photos printed on fabric by Spoonflower and quilting the resulting panels with thread painting.  I showed some of the quilts I had made in this manner.  Recently I had some more photos printed.  As I work through them I will chronicle some of the steps. Today I'm working on a panel with a picture of red maple leaves.  This is the photo that was uploaded to Spoonflower for this panel. And this is a photo of the panel I received from Spoonflower. I was truly astonished at how crisp and clear this print was.  (In fact, all the prints were amazing.) The next step in quilting this panel is choosing the threads to work with.  I like to choose many different threads, to add texture and depth to the finished problem.  So I pulled out my bins of threads and started to see what I already had that would work. I started with a reds.  They turned out to me more pinks, than reds, which I hadn't expected....

Marking a quilt for quilting

Image
          There are a number of ways to mark a quilt for quilting.  Stencils are available for a wide variety of designs.  Rulers and templates can be used to draw designs on the quilt top.  There are papers that are available to draw on, pin to the quilt and quilt over.  All of these work and can work well.  But there is another method I like to use if I want to do something that is not available in those other methods.            I had a quilt in which I had appliqued lizards crawling through open cubes.  I wanted to quilt those same lizards in the background.  So I used the method described below. The lizards were actually cut from the backing fabric.  I used those lizards to create a pattern to quilt as part of the background.           You will need your design, freezer paper, an iron and either white chalk (in stick form) or a pounce pad.  ...

Disappearing Four Patch Tutorial

Image
                                                     (scrappy disappearing 4 patch quilt) This is one of my favorite blocks.  It works well no matter what combination of fabrics you use.  My favorite way to build the block is with two different fabrics for each block but it can also be built with three or four different fabrics and still looks good. The block is called the disappearing four patch because it starts with a standard four path block.  Take four squares of the same size.  The squares in the picture below are 4" squares. Lay out the block with matching fabrics diagonally opposite each other.  Sew each row (a pair of squares) together with a 1/4" seam and press the seams towards the darker fabric. Then sew the columns.  Match the seams.  They should nestle together and help to make the corners line...

Preparing photos for Spoonflower printing

Image
Preparing photos for printing by Spoonflower is relatively simple.  In this tutorial, I will go through the steps I use.  I use Photoshop for the preparation.  While I am not familiar with Photoshop Elements, I'm fairly sure that it can do most of the functions described below.  If you are using Paint Shop Pro there will be similar functions. The first step is to pick the photo you want to have printed.   I took this photo of columbine today.  It is reasonably in focus, with good contrast and a fairly simple background.    But it can be improved. The first step is to adjust how light or dark the light values and dark values are.  The easiest way to do this in Photoshop is by using Levels.  This is on the image -- adjustments menu.  When you select this item you will see the following: The mountain looking block (histogram)  in the center of the dialog has three little triangles under it. ...

Inspirations

Image
Where do I find inspiration for my free motion quilting designs?  Lots of places!  Of course, I look at the work of other free motion quilters.  There are a lot of great quilters out there, and looking at quilts they have made is always inspirational.  Quilt shows are great sources of inspiration, big shows and little shows.  I've noticed recently that the level of free motion machine quilting is rising all the time.  It's wonderful. The internet provides many sources of inspiration: Pinterest, Google images, blogs, boards, Facebook groups, YouTube.  And on-line classes at places like Craftsy and iQuilt.  But there are other sources as well.  Like this frieze from the mansion Nemours, in Delaware. (former home of Alfred I. DuPont, open to the public)   What a great idea for border or sashing.  Or this wrought iron railing.  With a little adjusting, it would make a great design for quilting in a block. Or ...